
Valentines Day Fudge: the perfect homemade treat to melt hearts this February! Forget the chocolates and roses; this year, show your love with a rich, decadent, and utterly irresistible fudge that’s surprisingly easy to make. I remember my grandmother making fudge every Valentine’s Day, a tradition that filled our home with the sweet aroma of chocolate and the warmth of family. It wasn’t just about the fudge; it was about the love and care she poured into every batch.
While the exact origins of fudge are debated, it’s believed to have originated in America in the late 19th century. Legend has it that a batch of caramels “fudged” up, resulting in this delightful confection. And thank goodness it did! People adore fudge for its creamy, smooth texture and intense sweetness. It’s a comforting indulgence, a small square of happiness that satisfies any sweet craving. Plus, it’s incredibly versatile! You can customize it with different flavors, nuts, and toppings to create a truly unique and personalized gift. This Valentines Day Fudge recipe is no exception. Get ready to create a memorable and delicious Valentine’s Day with this simple yet impressive treat!

Ingredients:
- 1 (14 ounce) can sweetened condensed milk
- 3 cups semi-sweet chocolate chips
- 1/2 cup (1 stick) unsalted butter, cut into pieces
- 1 teaspoon vanilla extract
- 1/4 teaspoon salt
- Optional toppings: Red and pink sprinkles, heart-shaped candies, chopped nuts, dried cranberries
Preparing the Fudge Base
- Gather Your Equipment: Before you even think about melting chocolate, make sure you have everything you need within arm’s reach. This includes a medium-sized saucepan, a heat-resistant spatula (silicone is ideal), an 8×8 inch baking pan, parchment paper, and your measuring cups and spoons. Trust me, scrambling for a spatula while your chocolate is burning is not a fun experience.
- Prepare the Pan: Line your 8×8 inch baking pan with parchment paper. This is crucial! The parchment paper will act as a sling, allowing you to easily lift the fudge out of the pan once it’s set. Make sure the parchment paper overhangs the sides of the pan this will be your handle. If you don’t have parchment paper, you can grease the pan really well with butter or cooking spray, but the parchment paper method is much easier and cleaner.
- Combine the Ingredients: In your medium-sized saucepan, combine the sweetened condensed milk, semi-sweet chocolate chips, and butter. Make sure the butter is cut into pieces; this will help it melt more evenly and prevent scorching.
- Melt the Chocolate: Place the saucepan over low heat. This is where patience comes in. You want to melt the chocolate slowly and gently to avoid burning it. Stir the mixture constantly with your heat-resistant spatula. Make sure you scrape the bottom and sides of the pan to prevent any chocolate from sticking and burning.
- Continue Melting: Keep stirring until the chocolate chips and butter are completely melted and the mixture is smooth and glossy. This usually takes about 5-7 minutes. Don’t rush the process! If you see any signs of burning, immediately remove the pan from the heat and continue stirring.
- Add Flavor Enhancers: Once the chocolate mixture is smooth, remove the saucepan from the heat. Stir in the vanilla extract and salt. The vanilla extract adds a lovely depth of flavor, and the salt helps to balance the sweetness of the fudge.
- Stir Until Combined: Stir everything together until the vanilla extract and salt are fully incorporated. The mixture should be uniform in color and consistency.
Adding the Valentine’s Day Flair
- Pour into the Pan: Pour the melted fudge mixture into your prepared 8×8 inch baking pan. Use your spatula to spread the fudge evenly across the bottom of the pan.
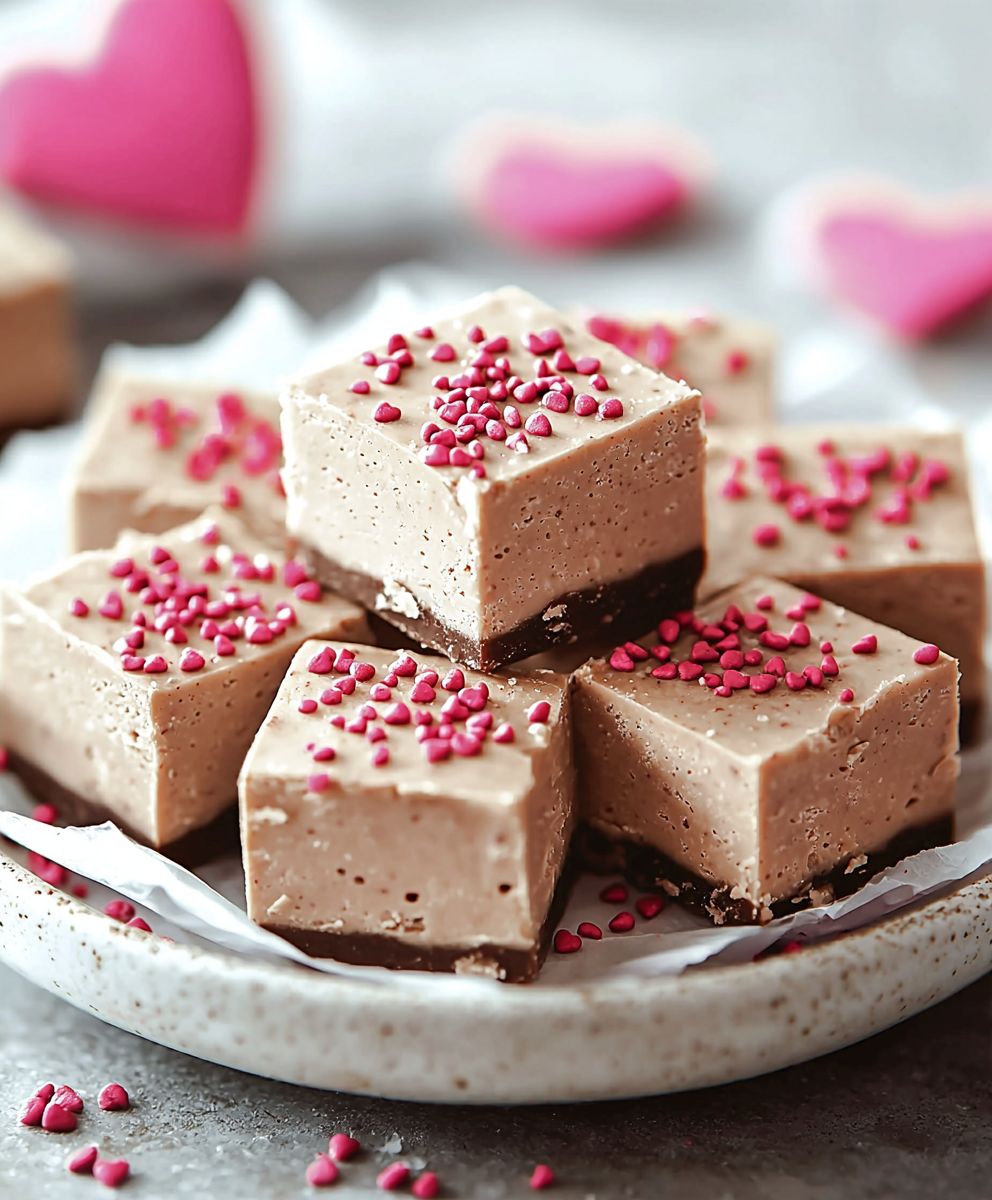
- Add Toppings (Optional): This is where you can get creative and add your Valentine’s Day flair! While the fudge is still soft, sprinkle your desired toppings over the top. Red and pink sprinkles are a classic choice, but you can also use heart-shaped candies, chopped nuts, dried cranberries, or even mini marshmallows.
- Press the Toppings: Gently press the toppings into the fudge to ensure they adhere properly. This will prevent them from falling off when you cut the fudge.
Setting and Cutting the Fudge
- Chill the Fudge: Cover the baking pan with plastic wrap and refrigerate for at least 2 hours, or preferably overnight. This will allow the fudge to set completely and become firm enough to cut.
- Remove from the Pan: Once the fudge is set, remove it from the refrigerator. Use the parchment paper overhangs to lift the fudge out of the pan.
- Cut into Squares: Place the fudge on a cutting board. Use a sharp knife to cut the fudge into squares. The size of the squares is up to you, but I usually aim for about 1-inch squares.
- Clean the Knife: After each cut, wipe the knife clean with a damp cloth. This will help you make clean, even cuts.
- Serve and Enjoy: Arrange the fudge squares on a serving platter and enjoy! This fudge is perfect for Valentine’s Day, but it’s also delicious any time of year.
Tips and Tricks for Perfect Fudge
- Use High-Quality Chocolate: The quality of your chocolate will directly impact the taste of your fudge. Use a good-quality semi-sweet chocolate chip for the best results.
- Don’t Overcook the Chocolate: Overcooking the chocolate can cause it to become grainy and dry. Melt the chocolate slowly and gently over low heat, and stir constantly to prevent burning.
- Adjust the Sweetness: If you prefer a less sweet fudge, you can use dark chocolate chips instead of semi-sweet chocolate chips.
- Add Different Flavors: Get creative and add different flavors to your fudge! You can add a teaspoon of peppermint extract for a festive holiday fudge, or a tablespoon of instant coffee granules for a mocha fudge.
- Store Properly: Store the fudge in an airtight container at room temperature for up to a week, or in the refrigerator for up to two weeks. You can also freeze the fudge for up to three months.
- Troubleshooting: If your fudge is too soft, it may not have been chilled long enough. Place it back in the refrigerator for a few more hours. If your fudge is too hard, it may have been overcooked. Next time, be sure to melt the chocolate slowly and gently over low heat.
- Variations: Consider adding a layer of peanut butter to the fudge. After pouring half of the chocolate mixture into the pan, spread a layer of peanut butter over the top. Then, pour the remaining chocolate mixture over the peanut butter.
- Presentation: For a more elegant presentation, you can drizzle melted white chocolate over the fudge after it has been cut into squares.
- Gift Giving: This fudge makes a wonderful homemade gift! Package the fudge in a decorative box or tin and tie it with a ribbon.
- Experiment with Extracts: Try different extracts to customize the flavor of your fudge. Almond extract, coconut extract, or even a hint of orange extract can add a unique twist.
- Nuts and Seeds: Incorporate chopped nuts or seeds into the fudge mixture for added texture and flavor. Walnuts, pecans, almonds, or even sunflower seeds would be delicious.
- Dried Fruit: Dried cranberries, cherries, or apricots can add a chewy and fruity element to your fudge.
- Spices: A pinch of cinnamon, nutmeg, or even cayenne pepper can add warmth and complexity to the flavor of your fudge.
- Marshmallows: Fold in mini marshmallows after melting the chocolate for a rocky road-inspired fudge.
- Cookie Crumbs: Sprinkle crushed cookies, such as Oreos or graham crackers, over the top of the fudge for added texture and flavor.
More Valentine’s Day Topping Ideas
- Red Hots: These spicy cinnamon candies add a pop of color and a fiery kick.
- Conversation Hearts: These classic Valentine’s Day candies are a fun and nostalgic addition.
- Chocolate Shavings: Use a vegetable peeler to create chocolate shavings from a bar of dark, milk, or white chocolate.
- Edible Glitter: Add a touch of sparkle with edible glitter.
- Melted Candy Melts: Drizzle melted candy melts in contrasting colors over the fudge.
- Crushed Pretzels: The salty crunch of crushed pretzels provides a nice contrast to the sweetness of the fudge.
- Mini Chocolate Chips: Use a variety of mini chocolate chips, such as milk chocolate, dark chocolate, and white chocolate.
- Toffee Bits: Toffee bits add a buttery and crunchy texture.
- Sea Salt: A sprinkle of sea salt enhances the sweetness of the fudge.
Conclusion:
This Valentine’s Day Fudge isn’t just a dessert; it’s a love letter written in chocolate! From its rich, decadent flavor to its stunning visual appeal, it’s guaranteed to be the star of your Valentine’s Day celebration, or any day you want to show someone you care. I truly believe this recipe is a must-try because it’s surprisingly simple to make, yet delivers a gourmet experience that will impress even the most discerning palates. Forget those store-bought chocolates this homemade fudge is made with love (and significantly better ingredients!).
But the best part? It’s incredibly versatile! While the recipe as written is divine, feel free to experiment and make it your own. For a richer, more intense chocolate experience, use dark chocolate with a higher cocoa percentage. If you’re a fan of nuts, stir in chopped walnuts, pecans, or almonds after melting the chocolate. Craving something a little different? Add a swirl of peanut butter or a layer of salted caramel for an extra touch of indulgence. For a festive twist, consider adding crushed peppermint candies for a holiday treat, or dried cranberries and orange zest for a wintery delight.
Serving suggestions are endless! Cut the fudge into small squares and arrange them on a beautiful platter for a sophisticated dessert presentation. Package them in small boxes or bags tied with ribbon for adorable Valentine’s Day gifts. Serve alongside a scoop of vanilla ice cream or a warm cup of coffee for the ultimate comfort food experience. You can even crumble it over brownies or use it as a topping for cupcakes. The possibilities are truly limitless!
I’ve poured my heart into perfecting this recipe, and I’m confident that you’ll love it as much as I do. It’s the perfect way to express your affection and create lasting memories with your loved ones. The creamy texture and intense chocolate flavor are simply irresistible, making it a guaranteed crowd-pleaser. Plus, the vibrant colors and festive sprinkles make it visually stunning, adding a touch of elegance to any occasion.
So, what are you waiting for? Gather your ingredients, put on some romantic music, and get ready to create some magic in the kitchen. I promise, this Valentine’s Day Fudge will be a recipe you’ll make again and again. It’s the perfect combination of simplicity, flavor, and visual appeal, making it a truly unforgettable treat.
I’m so excited for you to try this recipe! Once you’ve made it, please come back and share your experience in the comments below. I’d love to hear about your variations, serving suggestions, and how much your loved ones enjoyed it. Did you add any special ingredients? Did you create a unique presentation? Your feedback is invaluable and helps me continue to improve and share delicious recipes with the world. Happy baking, and Happy Valentine’s Day! I can’t wait to hear all about your fudge-making adventures! Remember to tag me in your photos on social media I’d love to see your creations!
Valentines Day Fudge: The Ultimate Recipe for Sweethearts
Easy, creamy, and decadent fudge made with sweetened condensed milk, chocolate chips, and a touch of vanilla. Customize with your favorite festive toppings!
Ingredients
- 1 (14 ounce) can sweetened condensed milk
- 3 cups semi-sweet chocolate chips
- 1/2 cup (1 stick) unsalted butter, cut into pieces
- 1 teaspoon vanilla extract
- 1/4 teaspoon salt
- Optional toppings: Red and pink sprinkles, heart-shaped candies, chopped nuts, dried cranberries
Instructions
- Prepare the Pan: Line an 8×8 inch baking pan with parchment paper, leaving an overhang on the sides.
- Combine Ingredients: In a medium saucepan, combine sweetened condensed milk, chocolate chips, and butter.
- Melt Chocolate: Melt over low heat, stirring constantly with a heat-resistant spatula until smooth and glossy (5-7 minutes). Be careful not to burn the chocolate.
- Add Flavor: Remove from heat and stir in vanilla extract and salt until well combined.
- Pour and Top: Pour the melted fudge into the prepared pan and spread evenly.
- Add Toppings: Sprinkle desired toppings over the fudge and gently press them in.
- Chill: Cover with plastic wrap and refrigerate for at least 2 hours, or preferably overnight, until firm.
- Cut and Serve: Lift the fudge out of the pan using the parchment paper overhang. Cut into squares and serve. Clean the knife between cuts for cleaner edges.
Notes
- Use high-quality chocolate chips for the best flavor.
- Melt the chocolate slowly over low heat to prevent burning.
- Adjust sweetness by using dark chocolate chips instead of semi-sweet.
- Get creative with flavorings! Try peppermint extract, instant coffee, or almond extract.
- Store in an airtight container at room temperature for up to a week, or in the refrigerator for up to two weeks. Can be frozen for up to three months.
- If the fudge is too soft, chill it longer. If it’s too hard, be more careful not to overcook the chocolate next time.
- Consider adding a layer of peanut butter for a delicious variation.
- Drizzle with melted white chocolate for a more elegant presentation.
- This fudge makes a wonderful homemade gift!


Leave a Comment