
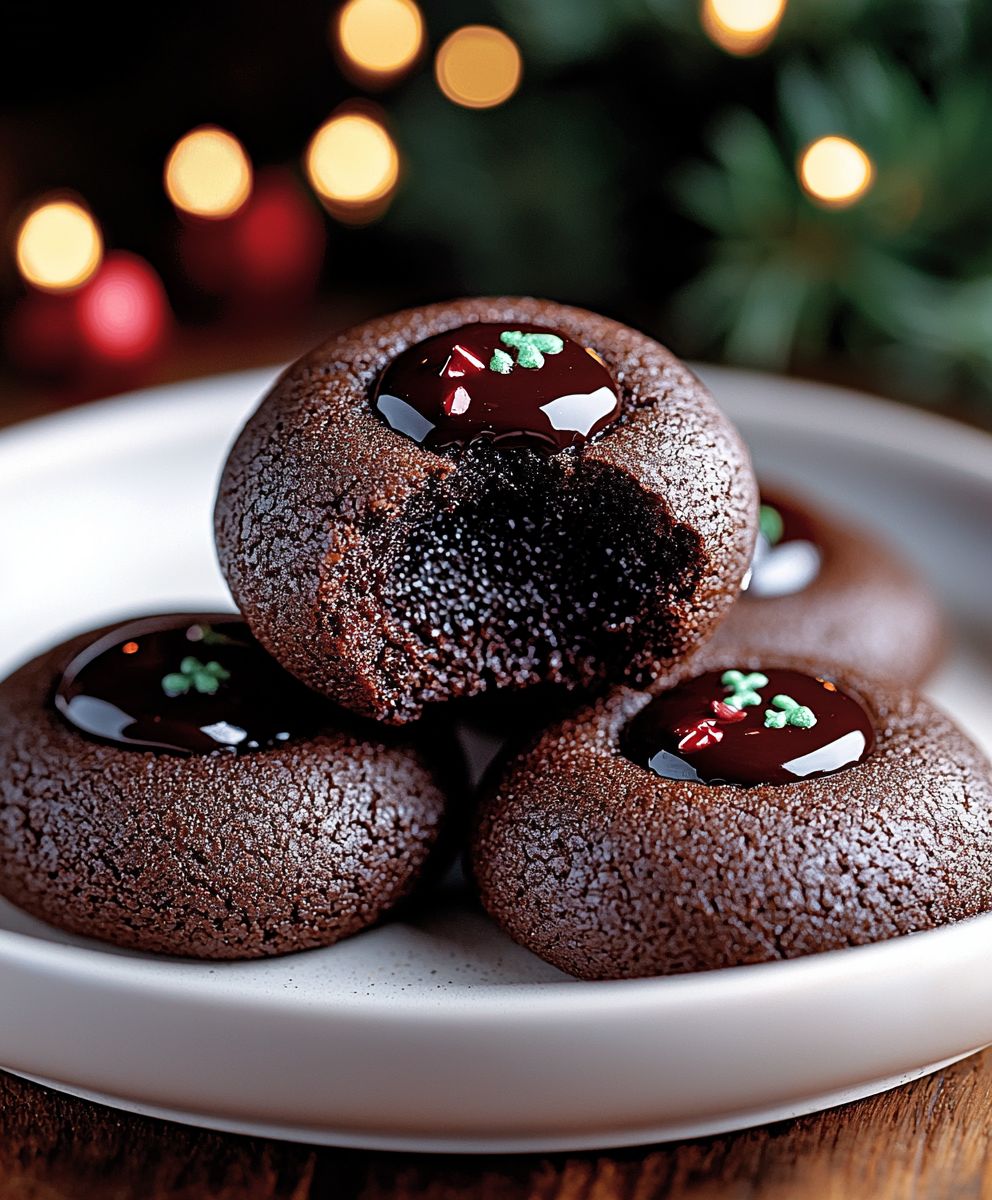
Chocolate Thumbprint Cookies: Is there anything more comforting than a batch of freshly baked cookies, especially when they boast a rich, chocolatey flavor and a delightful surprise in the center? I think not! These aren’t just any cookies; they’re a nostalgic trip back to childhood, a warm hug in dessert form, and a guaranteed crowd-pleaser at any gathering.
Thumbprint cookies, in general, have a fascinating history, with variations found across numerous cultures. Some believe they originated in Sweden or Poland, where similar filled cookies have been enjoyed for centuries. The beauty of the thumbprint cookie lies in its simplicity and versatility. While traditionally filled with jam, the chocolate thumbprint cookies take things to a whole new level with their decadent chocolate dough and a variety of filling options.
What makes these cookies so irresistible? It’s the perfect combination of textures and flavors. The slightly crisp edges give way to a soft, chewy center, while the rich chocolate dough is perfectly balanced by the sweetness of the filling. Whether you choose a classic raspberry jam, a creamy peanut butter cup, or a luscious chocolate ganache, each bite is an explosion of deliciousness. Plus, they’re surprisingly easy to make, making them the perfect treat for both experienced bakers and kitchen novices alike. Get ready to experience cookie perfection!

Ingredients:
- For the Cookies:
- 1 cup (2 sticks) unsalted butter, softened
- 1/2 cup granulated sugar
- 1/2 cup packed light brown sugar
- 1 large egg
- 1 teaspoon vanilla extract
- 2 1/4 cups all-purpose flour
- 1/4 cup unsweetened cocoa powder
- 1/2 teaspoon baking soda
- 1/4 teaspoon salt
- For the Chocolate Ganache Filling:
- 4 ounces semi-sweet chocolate, finely chopped
- 1/4 cup heavy cream
- 1 tablespoon unsalted butter
- 1/4 teaspoon vanilla extract
- Optional Toppings:
- Sprinkles
- Chopped nuts (walnuts, pecans, or almonds work well)
- Sea salt flakes
Preparing the Cookie Dough
- Cream the Butter and Sugars: In a large bowl, or the bowl of your stand mixer, cream together the softened butter, granulated sugar, and brown sugar until light and fluffy. This usually takes about 3-5 minutes. Make sure to scrape down the sides of the bowl occasionally to ensure everything is evenly incorporated. The mixture should be pale and airy. This step is crucial for achieving a tender cookie. Don’t rush it!
- Add the Egg and Vanilla: Beat in the egg and vanilla extract until well combined. Again, scrape down the sides of the bowl to make sure everything is mixed properly. The mixture might look slightly curdled at this point, but don’t worry, it will come together when you add the dry ingredients.
- Combine Dry Ingredients: In a separate medium bowl, whisk together the flour, cocoa powder, baking soda, and salt. Whisking ensures that the baking soda and salt are evenly distributed throughout the flour, which is important for proper leavening and flavor.
- Gradually Add Dry Ingredients to Wet Ingredients: Gradually add the dry ingredients to the wet ingredients, mixing on low speed until just combined. Be careful not to overmix the dough, as this can result in tough cookies. Mix until the flour is just incorporated and no streaks of flour remain. Overmixing develops the gluten in the flour, leading to a chewier, less tender cookie.
- Chill the Dough: Wrap the dough in plastic wrap and chill in the refrigerator for at least 30 minutes. Chilling the dough helps to prevent the cookies from spreading too much during baking and also allows the flavors to meld together. You can chill the dough for up to 24 hours. If chilling for longer than an hour, you might need to let the dough sit at room temperature for a few minutes before scooping, as it will become quite firm.
Shaping and Baking the Cookies
- Preheat Oven and Prepare Baking Sheets: Preheat your oven to 350°F (175°C). Line baking sheets with parchment paper or silicone baking mats. Parchment paper prevents the cookies from sticking and makes cleanup easier. Silicone mats provide even heat distribution and prevent the bottoms of the cookies from browning too quickly.
- Scoop and Roll the Dough: Using a small cookie scoop or a spoon, scoop out rounded tablespoons of dough. Roll each portion into a smooth ball. The size of the balls will determine the size of your cookies, so try to keep them consistent for even baking.
- Place on Baking Sheets: Place the dough balls onto the prepared baking sheets, leaving about 2 inches between each cookie to allow for spreading.
- Make the Thumbprints: Use your thumb or the back of a small spoon to gently press an indentation into the center of each cookie. Be careful not to press all the way through the dough. You want to create a well for the chocolate ganache filling.
- Bake the Cookies: Bake for 8-10 minutes, or until the edges are set and the bottoms are lightly golden brown. The cookies will still look slightly soft in the center, but they will firm up as they cool.
- Cool on Baking Sheets: Remove the baking sheets from the oven and let the cookies cool on the baking sheets for a few minutes before transferring them to a wire rack to cool completely. This prevents the cookies from breaking while they are still warm and soft.
Making the Chocolate Ganache Filling
- Heat the Cream: Place the heavy cream in a small saucepan and heat over medium heat until it just begins to simmer. Do not boil the cream.
- Pour Over Chocolate: Remove the saucepan from the heat and pour the hot cream over the finely chopped chocolate in a heatproof bowl.
- Let Sit: Let the mixture sit for 1 minute to allow the heat from the cream to melt the chocolate.
- Stir Until Smooth: Gently stir the mixture until the chocolate is completely melted and the ganache is smooth and glossy. Add the butter and vanilla extract and stir until fully incorporated. The ganache should be thick and creamy. If it’s too thick, add a teaspoon of hot cream at a time until you reach the desired consistency. If it’s too thin, let it sit at room temperature for a few minutes to thicken slightly.
Filling and Decorating the Cookies
- Fill the Thumbprints: Once the cookies are completely cool, spoon or pipe the chocolate ganache into the thumbprint indentations. You can use a small spoon or a piping bag fitted with a small round tip for a neater presentation.
- Add Toppings (Optional): While the ganache is still soft, sprinkle with your desired toppings, such as sprinkles, chopped nuts, or sea salt flakes. The toppings will adhere better to the soft ganache.
- Let Set: Allow the ganache to set completely before serving or storing the cookies. This usually takes about 30 minutes to an hour at room temperature, or you can speed up the process by placing the cookies in the refrigerator for a shorter period.
Tips for Perfect Thumbprint Cookies
- Use Room Temperature Butter: Softened butter is essential for creating a light and fluffy cookie dough. Make sure the butter is soft but not melted.
- Don’t Overmix the Dough: Overmixing can result in tough cookies. Mix until the flour is just incorporated.
- Chill the Dough: Chilling the dough prevents the cookies from spreading too much during baking.
- Make Consistent Thumbprints: Use your thumb or the back of a small spoon to create uniform indentations in the cookies.
- Don’t Overbake: Overbaked cookies will be dry and crumbly. Bake until the edges are set and the bottoms are lightly golden brown.
- Use High-Quality Chocolate: The quality of the chocolate will affect the flavor of the ganache. Use a good quality semi-sweet chocolate for the best results.
- Adjust Ganache Consistency: If the ganache is too thick, add a teaspoon of hot cream at a time until you reach the desired consistency. If it’s too thin, let it sit at room temperature for a few minutes to thicken slightly.
- Get Creative with Toppings: Experiment with different toppings to create your own unique thumbprint cookies.
Storage Instructions
Store the chocolate thumbprint cookies in an airtight container at room temperature for up to 3-4 days. You can also store them in the refrigerator for up to a week. For longer storage, you can freeze the cookies for up to 2 months. Thaw the cookies at room temperature before serving.
Variations
- Peanut Butter Thumbprint Cookies: Substitute 1/2 cup of the butter with peanut butter for a peanut butter flavor.
- Jam Thumbprint Cookies: Fill the thumbprints with your favorite jam instead of chocolate ganache.
- Lemon Thumbprint Cookies: Add lemon zest to the cookie dough and fill the thumbprints with lemon curd.
- White Chocolate Thumbprint Cookies: Use white chocolate instead of semi-sweet chocolate for the ganache.
Troubleshooting
- Cookies are spreading too much: Make sure you are using the correct amount of flour and that your oven temperature is accurate. Also, make sure you are chilling the dough for at least 30 minutes.
- Cookies are dry: Don’t overbake the cookies. Bake until the edges are set and the bottoms are lightly golden brown.
- Ganache is too thick: Add a teaspoon of hot cream at a time until you reach the desired consistency.
- Ganache is too thin: Let it sit at room temperature
Conclusion:
And there you have it! These Chocolate Thumbprint Cookies are more than just a sweet treat; they’re a little bite of happiness, perfect for any occasion. From the rich, decadent chocolate cookie base to the sweet, customizable filling, every element of this recipe is designed to delight. I truly believe this is a must-try recipe for any baking enthusiast, whether you’re a seasoned pro or just starting out. The process is straightforward, the ingredients are readily available, and the results are simply irresistible. But what makes these cookies truly special is their versatility. While I’ve shared my go-to recipe with a classic chocolate ganache filling, the possibilities are endless! Feel free to experiment with different fillings to create your own signature thumbprint cookie. Imagine a tangy raspberry jam filling for a burst of fruity flavor, or a creamy peanut butter filling for a delightful chocolate-peanut butter combination. You could even try a salted caramel filling for a sophisticated twist, or a simple sprinkle of sea salt on top of the ganache for an extra layer of flavor.Serving Suggestions and Variations:
These Chocolate Thumbprint Cookies are fantastic on their own, but they also pair beautifully with a variety of beverages. A glass of cold milk is a classic choice, of course, but they’re also wonderful with a cup of hot coffee or tea. For a more decadent experience, try serving them with a scoop of vanilla ice cream or a dollop of whipped cream. Here are a few more ideas to get your creative juices flowing: * Holiday Cookies: Use festive sprinkles or colored sugars to decorate the cookies for Christmas, Hanukkah, or any other holiday. * Mini Thumbprints: Make smaller cookies for a bite-sized treat that’s perfect for parties or snacking. * Gluten-Free Option: Substitute the all-purpose flour with a gluten-free blend for a delicious treat that everyone can enjoy. * Vegan Option: Replace the butter with a vegan butter alternative and the egg with a flax egg (1 tablespoon of ground flaxseed mixed with 3 tablespoons of water) for a vegan-friendly version. * Nutty Delight: Add chopped nuts, such as pecans or walnuts, to the cookie dough for a crunchy texture and nutty flavor. I’m so excited for you to try this recipe and discover the joy of baking these delightful Chocolate Thumbprint Cookies. I’ve poured my heart into creating a recipe that’s both delicious and easy to follow, and I truly believe you’ll love the results. So, what are you waiting for? Preheat your oven, gather your ingredients, and get ready to bake a batch of these irresistible cookies. I promise, you won’t be disappointed! And most importantly, I’d love to hear about your experience! Did you try a different filling? Did you make any modifications to the recipe? Share your photos and stories in the comments below. I can’t wait to see your creations and hear about your baking adventures. Happy baking! Let me know if you have any questions, and I’ll do my best to help. Enjoy your Chocolate Thumbprint Cookies! Print
Chocolate Thumbprint Cookies: A Delicious & Easy Recipe
- Total Time: 60 minutes
- Yield: 24 cookies 1x
Description
Chocolate thumbprint cookies with a rich, homemade ganache filling. These melt-in-your-mouth treats are customizable and perfect for any occasion.
Ingredients
- 1 cup (2 sticks) unsalted butter, softened
- 1/2 cup granulated sugar
- 1/2 cup packed light brown sugar
- 1 large egg
- 1 teaspoon vanilla extract
- 2 1/4 cups all-purpose flour
- 1/4 cup unsweetened cocoa powder
- 1/2 teaspoon baking soda
- 1/4 teaspoon salt
- 4 ounces semi-sweet chocolate, finely chopped
- 1/4 cup heavy cream
- 1 tablespoon unsalted butter
- 1/4 teaspoon vanilla extract
- Sprinkles
- Chopped nuts (walnuts, pecans, or almonds work well)
- Sea salt flakes
Instructions
- Cream the Butter and Sugars: In a large bowl, or the bowl of your stand mixer, cream together the softened butter, granulated sugar, and brown sugar until light and fluffy (3-5 minutes). Scrape down the sides of the bowl occasionally.
- Add the Egg and Vanilla: Beat in the egg and vanilla extract until well combined. Scrape down the sides of the bowl.
- Combine Dry Ingredients: In a separate medium bowl, whisk together the flour, cocoa powder, baking soda, and salt.
- Gradually Add Dry Ingredients to Wet Ingredients: Gradually add the dry ingredients to the wet ingredients, mixing on low speed until just combined. Be careful not to overmix.
- Chill the Dough: Wrap the dough in plastic wrap and chill in the refrigerator for at least 30 minutes (up to 24 hours).
- Preheat Oven and Prepare Baking Sheets: Preheat your oven to 350°F (175°C). Line baking sheets with parchment paper or silicone baking mats.
- Scoop and Roll the Dough: Using a small cookie scoop or a spoon, scoop out rounded tablespoons of dough. Roll each portion into a smooth ball.
- Place on Baking Sheets: Place the dough balls onto the prepared baking sheets, leaving about 2 inches between each cookie.
- Make the Thumbprints: Use your thumb or the back of a small spoon to gently press an indentation into the center of each cookie.
- Bake the Cookies: Bake for 8-10 minutes, or until the edges are set and the bottoms are lightly golden brown.
- Cool on Baking Sheets: Remove the baking sheets from the oven and let the cookies cool on the baking sheets for a few minutes before transferring them to a wire rack to cool completely.
- Heat the Cream: Place the heavy cream in a small saucepan and heat over medium heat until it just begins to simmer. Do not boil the cream.
- Pour Over Chocolate: Remove the saucepan from the heat and pour the hot cream over the finely chopped chocolate in a heatproof bowl.
- Let Sit: Let the mixture sit for 1 minute to allow the heat from the cream to melt the chocolate.
- Stir Until Smooth: Gently stir the mixture until the chocolate is completely melted and the ganache is smooth and glossy. Add the butter and vanilla extract and stir until fully incorporated.
- Fill the Thumbprints: Once the cookies are completely cool, spoon or pipe the chocolate ganache into the thumbprint indentations.
- Add Toppings (Optional): While the ganache is still soft, sprinkle with your desired toppings, such as sprinkles, chopped nuts, or sea salt flakes.
- Let Set: Allow the ganache to set completely before serving or storing the cookies (30 minutes to 1 hour at room temperature, or shorter in the refrigerator).
Notes
- Use room temperature butter for a light and fluffy dough.
- Don’t overmix the dough.
- Chilling the dough prevents excessive spreading.
- Use high-quality chocolate for the ganache.
- Adjust ganache consistency as needed with small amounts of hot cream.
- Get creative with toppings!
- Prep Time: 30 minutes
- Cook Time: 8 minutes

Leave a Comment