
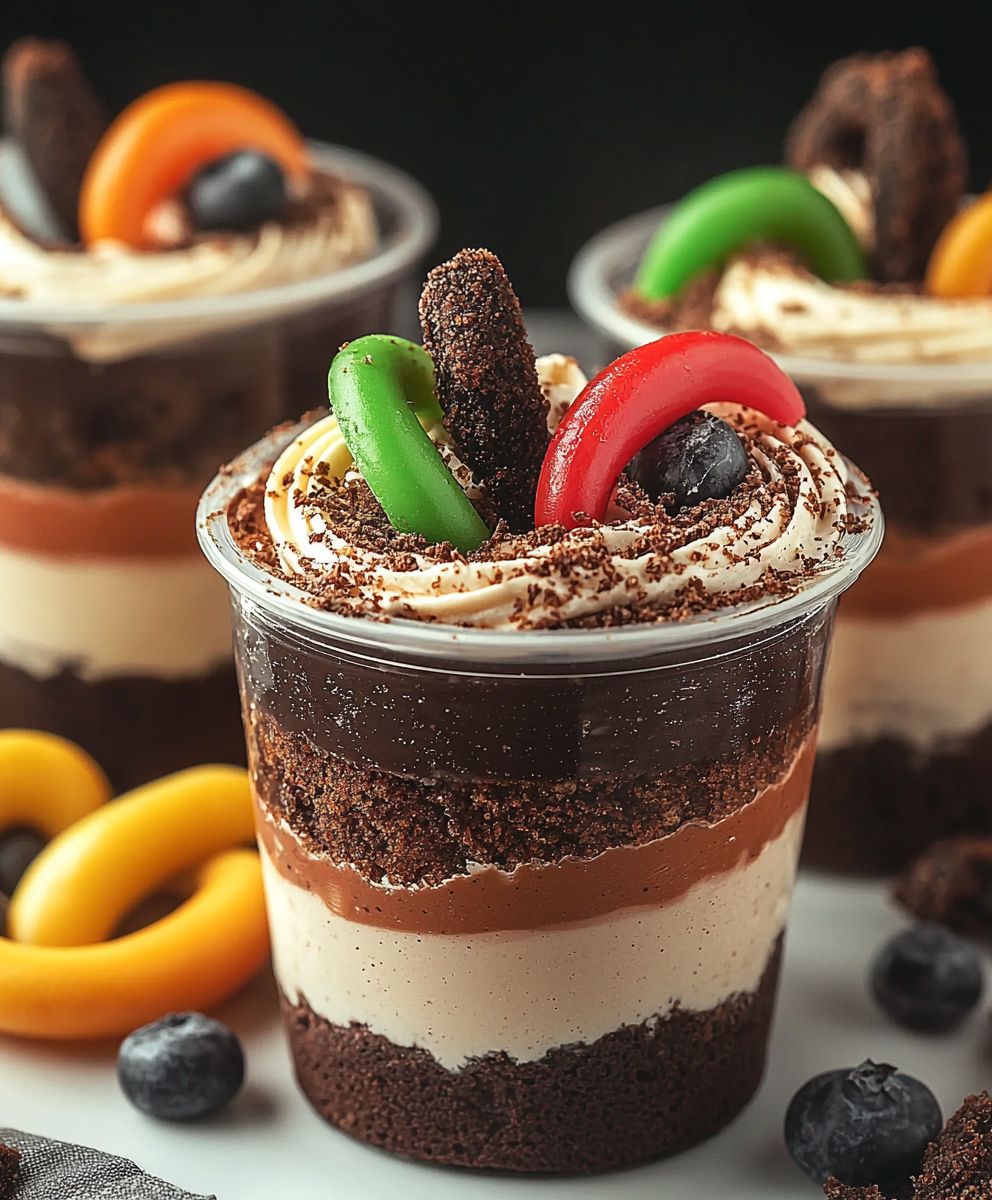
Dirt Cups: Prepare to unearth a delightful treat that will transport you straight back to childhood! Remember those carefree days of playing in the dirt? Well, this dessert captures that playful spirit in a delicious and surprisingly sophisticated way. Forget complicated baking projects; this is all about fun, simplicity, and pure, unadulterated joy in every spoonful.
While the exact origins of Dirt Cups are shrouded in a bit of mystery, their appeal is universally understood. They’ve become a staple at school parties, birthday celebrations, and family gatherings, offering a whimsical and engaging alternative to traditional desserts. Think of them as edible art projects, where kids (and adults!) can unleash their creativity and build their own miniature landscapes.
What makes Dirt Cups so irresistible? It’s the perfect combination of textures and flavors. The creamy, rich chocolate pudding, the crunchy, crumbly “dirt” made from crushed cookies, and the gummy worms wriggling through the layers create a symphony of sensations in your mouth. Plus, they’re incredibly easy to make, requiring minimal ingredients and effort. Whether you’re looking for a quick and easy dessert for a weeknight treat or a show-stopping centerpiece for a special occasion, Dirt Cups are guaranteed to be a crowd-pleaser. So, grab your spoons and get ready to dig in!

Ingredients:
- 1 (3.9 ounce) package instant chocolate pudding mix
- 2 cups cold milk
- 1 (8 ounce) container frozen whipped topping, thawed
- 1 (16 ounce) package chocolate sandwich cookies (like Oreos)
- 1/4 cup (1/2 stick) unsalted butter, melted
- Gummy worms, for garnish
- Optional: Chocolate sprinkles, for garnish
- Optional: Crushed peanut butter cups, for garnish
- Optional: Small plastic flower pots or clear cups, for serving
Preparing the Chocolate Pudding
Okay, let’s get started! First, we’re going to make the chocolate pudding. This is super easy and quick, which is perfect when you’re craving a sweet treat. I always find that using a good quality instant pudding mix makes a big difference in the final taste and texture. Don’t skimp on this step!
- Combine the pudding mix and milk: In a medium-sized mixing bowl, whisk together the instant chocolate pudding mix and the cold milk. Make sure you whisk it really well to avoid any lumps. You want a smooth, creamy consistency. I usually whisk for about 2 minutes to ensure everything is properly combined.
- Let it set: Once the pudding mix and milk are well combined, let the mixture stand for about 5 minutes, or until it thickens. You’ll notice it transforming from a liquid to a nice, thick pudding. This is the magic of instant pudding! If you’re in a hurry, you can pop it in the fridge for a few minutes to speed up the process.
- Fold in the whipped topping: Now, gently fold in the thawed whipped topping. Be careful not to overmix, as you want to keep the pudding light and airy. I like to use a rubber spatula for this step, as it helps to incorporate the whipped topping without deflating it. Fold until just combined, leaving some streaks of whipped topping for a nice visual effect.
Crushing the Cookies
Next up, we’re going to crush those chocolate sandwich cookies! This is where you can really get creative. You can use a food processor for a super fine crumb, or you can go old-school and use a resealable bag and a rolling pin for a more rustic texture. I personally prefer the rolling pin method it’s a bit more therapeutic, and I like having some larger cookie pieces in my dirt cups.
- Melt the butter (optional): If you want to add a buttery flavor to your cookie “dirt,” melt the butter in a microwave-safe bowl in 30-second intervals, stirring in between, until fully melted. Let it cool slightly before using. This step is optional, but I find it adds a richer flavor and helps the cookie crumbs stick together a bit better.
- Crush the cookies: Place the chocolate sandwich cookies in a large resealable bag. Seal the bag tightly, removing as much air as possible. Using a rolling pin, crush the cookies until they are finely ground. If you prefer larger pieces, don’t crush them quite as much. You can also use a food processor for this step, pulsing until you reach your desired consistency.
- Combine with melted butter (optional): If using, pour the melted butter over the crushed cookies in the bag. Seal the bag again and massage the butter into the cookie crumbs until they are evenly moistened. This will create a slightly clumpy, more realistic “dirt” texture.
Assembling the Dirt Cups
Now for the fun part assembling the dirt cups! This is where you can really let your creativity shine. You can use small plastic flower pots for a truly authentic “dirt cup” look, or you can use clear cups or glasses to show off the layers. I like to use a variety of serving containers to make things interesting.
- Layer the ingredients: Start by spooning a layer of crushed cookies into the bottom of each serving container. This will be your “dirt” base.
- Add a layer of pudding: Next, spoon a layer of the chocolate pudding mixture over the cookie crumbs. Be generous with the pudding it’s the star of the show!
- Repeat layers: Repeat the layers of crushed cookies and pudding until you reach the top of the container, ending with a layer of crushed cookies. This will give the appearance of a cup full of dirt.
- Garnish with gummy worms: Now for the finishing touch the gummy worms! Arrange the gummy worms on top of the crushed cookies to resemble worms crawling through the dirt. You can get creative with this step bury some of the worms partially in the “dirt” for a more realistic effect.
- Add optional toppings: If desired, sprinkle chocolate sprinkles or crushed peanut butter cups over the top of the dirt cups for added flavor and visual appeal. You can also add small plastic flowers to the “dirt” for a cute and whimsical touch.
- Chill before serving: For the best flavor and texture, chill the dirt cups in the refrigerator for at least 30 minutes before serving. This will allow the flavors to meld together and the pudding to set up even more.
Tips and Variations
Here are a few extra tips and variations to make your dirt cups even more amazing:
- Use different flavors of pudding: Experiment with different flavors of instant pudding mix, such as vanilla, butterscotch, or cheesecake. This will add a unique twist to your dirt cups.
- Add a layer of cream cheese frosting: For an extra decadent treat, add a layer of cream cheese frosting between the layers of cookies and pudding. This will add a tangy sweetness that complements the chocolate flavor perfectly.
- Use different types of cookies: Instead of chocolate sandwich cookies, try using graham crackers, shortbread cookies, or even chocolate chip cookies. Each type of cookie will add a different flavor and texture to your dirt cups.
- Make individual dirt cups in small mason jars: This is a great way to make dirt cups for parties or picnics. The mason jars are easy to transport and look adorable.
- Add a layer of fresh fruit: For a healthier twist, add a layer of fresh fruit, such as berries, bananas, or peaches, between the layers of cookies and pudding. This will add a burst of freshness and flavor.
- Make a giant dirt cup cake: Instead of individual dirt cups, layer the ingredients in a large bowl or trifle dish to create a giant dirt cup cake. This is perfect for parties or potlucks.
- Freeze the dirt cups for a frozen treat: For a refreshing summer treat, freeze the dirt cups for a few hours before serving. This will create a frozen dessert that is perfect for hot days.
- Add a few drops of peppermint extract to the pudding: This will give your dirt cups a refreshing minty flavor that is perfect for the holidays.
- Use sugar-free pudding and cookies for a healthier option: If you’re watching your sugar intake, you can use sugar-free pudding mix and sugar-free cookies to make a healthier version of dirt cups.
- Get the kids involved: Making dirt cups is a fun and easy activity that kids will love. Let them help with crushing the cookies, layering the ingredients, and decorating the dirt cups with gummy worms and sprinkles.
I hope you enjoy making these delicious and fun dirt cups! They’re perfect for parties, holidays, or just a sweet treat on a hot day. Don’t be afraid to experiment with different flavors and toppings to create your own unique version. Happy baking!
Conclusion:
So there you have it! These aren’t just any dessert; they’re a nostalgic trip back to childhood, a guaranteed crowd-pleaser, and surprisingly simple to whip up. But more than that, these Dirt Cups are a blank canvas for your creativity. The rich, chocolatey pudding, the crunchy Oreo “dirt,” and the gummy worms create a symphony of textures and flavors that’s simply irresistible. I truly believe this recipe is a must-try for anyone looking for a fun, easy, and utterly delicious treat. But why stop there? Let’s talk about some serving suggestions and variations to really make these Dirt Cups your own. For a more sophisticated take, consider using dark chocolate pudding and topping them with crushed chocolate cookies instead of Oreos. You could even add a layer of chocolate mousse for an extra decadent treat. For a healthier twist, try using sugar-free pudding and Greek yogurt for a lighter, protein-packed version. You can also swap out the gummy worms for fresh berries or chopped fruit for a burst of natural sweetness and vitamins. Imagine vibrant strawberries, juicy blueberries, or tangy raspberries peeking out from the “dirt”! Serving-wise, these Dirt Cups are perfect for parties, picnics, or even just a fun afternoon snack. For a party, you can set up a “Dirt Cup Bar” with various toppings and let your guests create their own personalized masterpieces. Think sprinkles, chocolate chips, mini marshmallows, and even edible flowers! If you’re making these for a picnic, be sure to pack them in individual containers with lids to prevent any spills. And for a truly special occasion, consider serving them in miniature terracotta pots for an authentic “garden” feel. I’ve made these Dirt Cups countless times, and they’re always a hit. The kids love them, the adults love them, and even the pickiest eaters can’t resist their charm. It’s a recipe that brings people together and creates lasting memories. But don’t just take my word for it. I encourage you to try this recipe for yourself and experience the joy of making (and eating!) these delightful treats. I’m confident that you’ll love them as much as I do. Once you’ve made your own batch of Dirt Cups, I’d love to hear about your experience! Did you try any of the variations I suggested? Did you add your own unique twist? What did your family and friends think? Please share your photos and stories in the comments below. I’m always eager to see how others are enjoying my recipes and to learn from your creative ideas. Let’s build a community of Dirt Cup enthusiasts and spread the joy of this classic dessert! So go ahead, grab your ingredients, and get ready to dig in! I promise you won’t be disappointed. Happy baking (or rather, assembling!), and I can’t wait to hear all about your Dirt Cup adventures. Remember, the best part about cooking is sharing the love, one delicious bite at a time. Enjoy! Print
Dirt Cups: A Delicious and Easy Dessert Recipe
- Total Time: 45 minutes
- Yield: 4–6 servings 1x
Description
Fun and easy dirt cups made with chocolate pudding, crushed Oreos, and gummy worms! A classic dessert that’s perfect for kids and adults alike.
Ingredients
- 1 (3.9 ounce) package instant chocolate pudding mix
- 2 cups cold milk
- 1 (8 ounce) container frozen whipped topping, thawed
- 1 (16 ounce) package chocolate sandwich cookies (like Oreos)
- 1/4 cup (1/2 stick) unsalted butter, melted (optional)
- Gummy worms, for garnish
- Chocolate sprinkles, for garnish (optional)
- Crushed peanut butter cups, for garnish (optional)
- Small plastic flower pots or clear cups, for serving (optional)
Instructions
- Prepare the Pudding: In a medium bowl, whisk together the instant chocolate pudding mix and cold milk until smooth. Let stand for 5 minutes, or until thickened. Gently fold in the thawed whipped topping until just combined.
- Crush the Cookies: Place chocolate sandwich cookies in a resealable bag. Seal and crush with a rolling pin until finely ground. (Alternatively, use a food processor). If using melted butter, pour over the crushed cookies and massage until evenly moistened.
- Assemble the Dirt Cups: Layer crushed cookies in the bottom of each serving container. Top with a layer of chocolate pudding. Repeat layers until the container is full, ending with a layer of crushed cookies.
- Garnish: Arrange gummy worms on top of the crushed cookies. Add optional toppings like chocolate sprinkles or crushed peanut butter cups.
- Chill: Refrigerate for at least 30 minutes before serving.
Notes
- For a richer flavor, use high-quality instant pudding mix.
- Don’t overmix the whipped topping into the pudding.
- Adjust the cookie crumb size to your preference.
- Get creative with serving containers!
- Experiment with different pudding flavors, cookies, and toppings.
- For a healthier option, use sugar-free pudding and cookies.
- Add a layer of cream cheese frosting for an extra decadent treat.
- Add a layer of fresh fruit, such as berries, bananas, or peaches, between the layers of cookies and pudding.
- Make a giant dirt cup cake by layering the ingredients in a large bowl or trifle dish.
- Freeze the dirt cups for a frozen treat.
- Add a few drops of peppermint extract to the pudding for a refreshing minty flavor.
- Get the kids involved in making the dirt cups.
- Prep Time: 15 minutes
- Cook Time: 0 minutes


Leave a Comment