
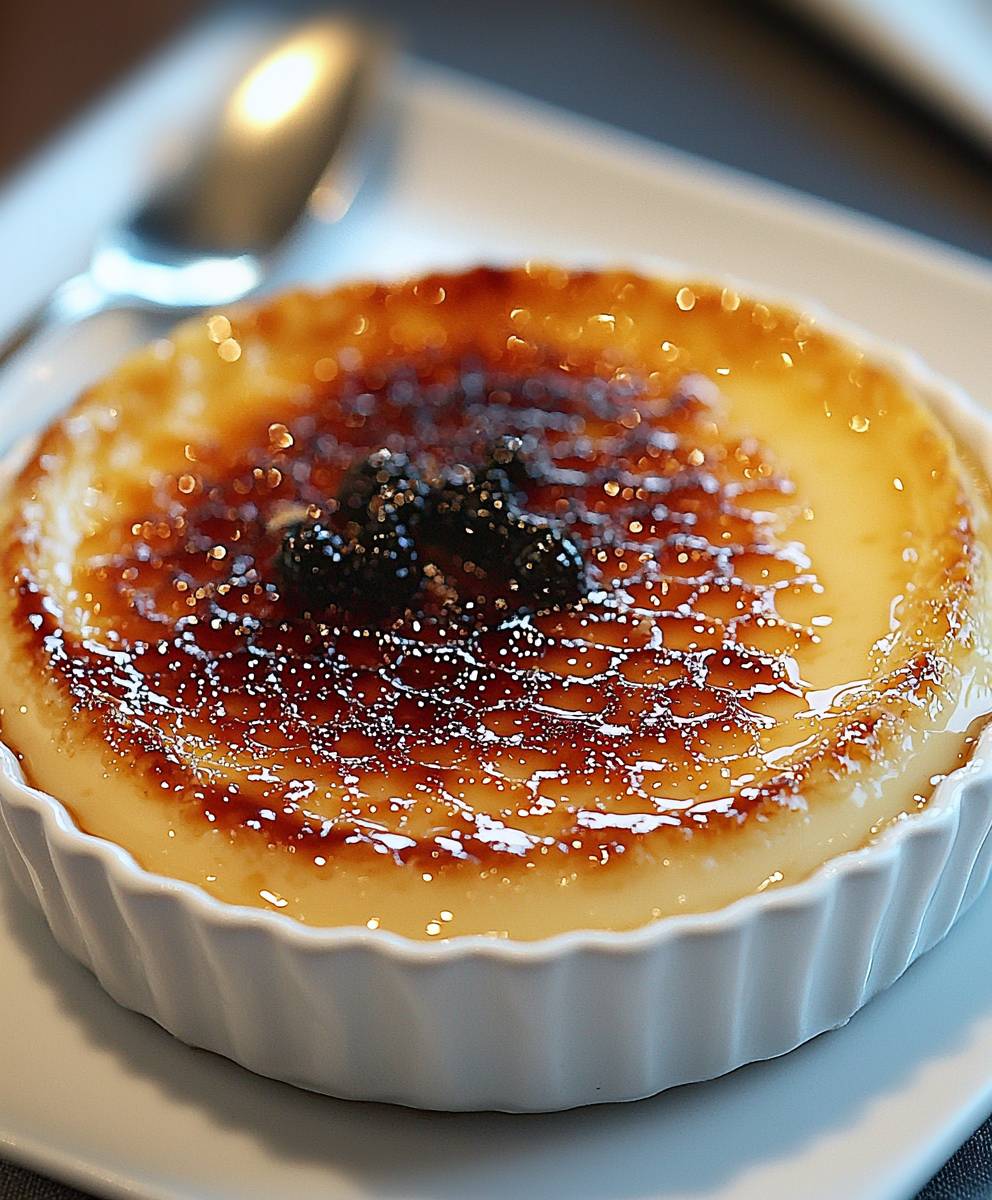
Dreams Creme Brulee, a dessert so decadent and divine, it truly lives up to its name! Imagine cracking through a delicate, brittle caramelized sugar crust to reveal a silky smooth, vanilla-infused custard underneath. The satisfying sound of the spoon breaking through the sugary shell is almost as delightful as the taste itself. Have I captured your attention yet?
Creme brulee, meaning “burnt cream” in French, boasts a rich history dating back to the 17th century. While its exact origins are debated, with claims from England and Spain as well, France has undoubtedly perfected this elegant dessert. It was once a staple in aristocratic circles, served at lavish banquets and grand celebrations. Today, it remains a symbol of culinary sophistication, gracing the menus of fine-dining restaurants worldwide.
But what makes Dreams Creme Brulee so universally loved? It’s the exquisite balance of textures and flavors. The contrast between the crunchy, slightly bitter caramelized top and the creamy, sweet custard is simply irresistible. The vanilla bean adds a subtle warmth and complexity that elevates the dish to another level. Plus, while it may seem intimidating to make, creme brulee is surprisingly straightforward, making it a perfect dessert for impressing guests or simply treating yourself to a little bit of luxury. So, let’s embark on this culinary adventure together, and I’ll show you how to create the perfect Dreams Creme Brulee at home!

Ingredients:
- 1 quart (4 cups) heavy cream
- 1 vanilla bean, split lengthwise and seeds scraped
- 1 cup granulated sugar, divided
- 6 large egg yolks
- Pinch of salt
- Water for the water bath
- Turbinado sugar (for brûléeing)
Preparing the Custard Base
Alright, let’s get started on this dreamy Crème Brûlée! The first step is creating that luscious custard base. Trust me, it’s easier than you think!
- Infuse the Cream: In a medium-sized saucepan, pour in the heavy cream. Add the split vanilla bean (both the pod and the seeds don’t waste that flavor!) and half a cup of the granulated sugar. Place the saucepan over medium heat. We’re not looking for a boil here, just a gentle simmer. You want to heat the cream until it’s steaming and the sugar is completely dissolved. This usually takes about 5-7 minutes. Stir occasionally to prevent the sugar from sticking to the bottom of the pan. Once it’s heated, remove the saucepan from the heat and let it steep for at least 30 minutes. This allows the vanilla flavor to really infuse into the cream. The longer it steeps, the more intense the vanilla flavor will be. You can even let it steep for an hour or two if you have the time!
- Prepare the Egg Yolks: While the cream is steeping, let’s get the egg yolks ready. In a separate medium-sized bowl, whisk together the egg yolks, the remaining half cup of granulated sugar, and a pinch of salt until the mixture is pale yellow and slightly thickened. This usually takes about 2-3 minutes of vigorous whisking. The sugar helps to prevent the yolks from scrambling when we add the hot cream later.
- Temper the Egg Yolks: This is a crucial step to prevent scrambled eggs! Slowly drizzle a small amount of the warm cream mixture (about 1/2 cup) into the egg yolk mixture while whisking constantly. This gradually raises the temperature of the egg yolks, preventing them from cooking too quickly when you add the rest of the hot cream. Continue to whisk until the mixture is smooth and well combined.
- Combine and Strain: Now, slowly pour the tempered egg yolk mixture back into the saucepan with the remaining warm cream. Whisk gently to combine everything. At this point, I like to strain the mixture through a fine-mesh sieve into a clean bowl or measuring cup. This removes any bits of cooked egg or vanilla bean pod that might have made their way into the custard, resulting in an ultra-smooth and creamy final product.
Baking the Crème Brûlée
Now comes the fun part baking! The key to a perfect Crème Brûlée is a gentle, even bake, which is why we use a water bath.
- Prepare the Ramekins: Preheat your oven to 325°F (160°C). Arrange your ramekins (usually 6-8, depending on the size) in a baking dish with sides at least 2 inches high. I prefer using individual ramekins for easy serving, but you can also use a larger baking dish if you prefer.
- Fill the Ramekins: Carefully pour the custard mixture into the ramekins, filling them almost to the top. Leave a little bit of space to prevent spillage during baking.
- Create the Water Bath: Carefully pour hot water into the baking dish, filling it until the water level reaches about halfway up the sides of the ramekins. The water bath helps to regulate the temperature and prevents the custard from cooking too quickly or curdling.
- Bake: Gently place the baking dish in the preheated oven and bake for 40-50 minutes, or until the custards are set around the edges but still slightly wobbly in the center. The baking time will vary depending on the size and shape of your ramekins, so keep an eye on them. You’ll know they’re done when they jiggle slightly when you gently shake the baking dish.
- Cool and Chill: Once the custards are baked, carefully remove the baking dish from the oven and let the ramekins cool in the water bath for about 30 minutes. Then, remove the ramekins from the water bath and let them cool completely at room temperature. Once cooled, cover the ramekins with plastic wrap and refrigerate for at least 4 hours, or preferably overnight. This allows the custards to fully set and develop their flavor.
Brûléeing and Serving
The grand finale! This is where the magic happens and we get that signature crackly sugar crust.
- Prepare for Brûléeing: Before brûléeing, make sure the tops of the custards are completely dry. If there’s any condensation, gently blot it with a paper towel. This will help the sugar to melt and caramelize evenly.
- Sprinkle with Sugar: Sprinkle a thin, even layer of turbinado sugar over the top of each custard. Turbinado sugar is preferred because it has larger crystals that caramelize beautifully and create a nice, crunchy crust. Don’t use too much sugar, or the crust will be too thick and hard to crack.
- Brûlée the Sugar: Using a kitchen torch, hold the flame about 2-3 inches away from the surface of the sugar and move it in a circular motion. The sugar should melt and caramelize quickly, turning a deep golden brown color. Be careful not to burn the sugar, as it will taste bitter. If you don’t have a kitchen torch, you can also use the broiler in your oven. Place the ramekins on a baking sheet and broil them for a few minutes, watching them very closely to prevent burning.
- Let the Sugar Harden: After brûléeing, let the sugar crust harden for a minute or two before serving. This will give it that satisfying crack when you tap it with a spoon.
- Serve and Enjoy: Serve the Crème Brûlée immediately after brûléeing. The contrast between the cold, creamy custard and the warm, crunchy sugar crust is simply divine! You can garnish with fresh berries or a sprig of mint, if desired.
Tips for Success
- Use high-quality ingredients: Since this recipe is so simple, the quality of the ingredients really shines through. Use the best heavy cream and vanilla bean you can find.
- Don’t overbake the custard: Overbaked custard will be tough and rubbery. The custard should be set around the edges but still slightly wobbly in the center.
- Chill the custard thoroughly: Chilling the custard overnight allows it to fully set and develop its flavor.
- Brûlée the sugar just before serving: The sugar crust will soften if it sits for too long.
- Be careful when using the kitchen torch: Always use caution when working with an open flame.
Troubleshooting
- Custard is curdled: This usually happens when the custard is cooked too quickly or at too high a temperature. Make sure to use a water bath and bake the custard at a low temperature.
- Sugar is burning: Hold the kitchen torch further away from the sugar and move it in a circular motion.
- Sugar is not caramelizing: Make sure the tops of the custards are completely dry before brûléeing. You may also need to use a higher heat setting on your kitchen torch.
Variations
- Chocolate Crème Brûlée: Add 2 ounces of melted bittersweet chocolate to the custard mixture before baking.
- Coffee Crème Brûlée: Add 1 tablespoon of instant espresso powder to the custard mixture before baking.
- Lavender Crème Brûlée: Infuse the cream with 1 teaspoon of dried lavender flowers.
Conclusion:
And there you have it! This Dreams Creme Brulee recipe isn’t just another dessert; it’s an experience. From the satisfying crack of the caramelized sugar to the smooth, velvety custard underneath, every spoonful is pure bliss. I truly believe this is a must-try recipe for anyone who appreciates a touch of elegance and a whole lot of flavor. It’s surprisingly simple to make, yet delivers a restaurant-quality dessert that will impress your friends and family. Why is it a must-try? Because it’s more than just a dessert; it’s a moment of pure indulgence. Its the perfect ending to a special dinner, a delightful treat for a weekend gathering, or even just a little something to brighten up a regular Tuesday. The creamy texture, the subtle vanilla notes, and the contrasting crunch of the caramelized sugar create a symphony of sensations that will leave you wanting more. Plus, the presentation is stunning! Imagine serving these beautiful ramekins of golden-topped custard it’s guaranteed to elicit oohs and aahs. But the best part? It’s incredibly versatile! While the classic vanilla bean version is divine, feel free to experiment with different flavors. Infuse the cream with citrus zest (lemon or orange would be amazing!), add a splash of your favorite liqueur (Grand Marnier or Frangelico, perhaps?), or even incorporate a hint of spice like cinnamon or cardamom. For a truly decadent twist, try adding a layer of chocolate ganache to the bottom of the ramekins before pouring in the custard. Serving suggestions? The possibilities are endless! Serve your Dreams Creme Brulee chilled, straight from the refrigerator, for the most refreshing experience. A few fresh berries, like raspberries or strawberries, make a beautiful and flavorful garnish. A sprig of mint adds a touch of freshness and visual appeal. For a more substantial dessert, pair it with a scoop of vanilla ice cream or a dollop of whipped cream. And if you’re feeling extra fancy, a drizzle of chocolate sauce or caramel sauce will take it over the top. Don’t be intimidated by the name; this recipe is easier than you think. Just follow the instructions carefully, and you’ll be rewarded with a dessert that tastes like it came straight from a Parisian patisserie. The key is to use high-quality ingredients and to be patient with the caramelization process. Don’t rush it! Let the sugar melt slowly and evenly to achieve that perfect golden-brown crust. I’m so excited for you to try this recipe! I know you’re going to love it as much as I do. It’s become a staple in my kitchen, and I’m confident it will become one in yours too. It’s the perfect dessert to impress guests, celebrate a special occasion, or simply treat yourself to something delicious. So, go ahead, gather your ingredients, and get ready to create some magic in the kitchen. And please, don’t forget to share your experience with me! I’d love to hear how your Dreams Creme Brulee turned out, what variations you tried, and what your guests thought. Tag me in your photos on social media, or leave a comment below. I can’t wait to see your creations! Happy baking! Print
Dreams Creme Brulee: A Decadent Dessert Recipe You’ll Love
- Total Time: 4 hours 50 minutes
- Yield: 6–8 servings 1x
Description
Rich and creamy Crème Brûlée with a crackly caramelized sugar crust. A classic dessert made easy!
Ingredients
- 1 quart (4 cups) heavy cream
- 1 vanilla bean, split lengthwise and seeds scraped
- 1 cup granulated sugar, divided
- 6 large egg yolks
- Pinch of salt
- Water for the water bath
- Turbinado sugar (for brûléeing)
Instructions
- In a medium-sized saucepan, pour in the heavy cream. Add the split vanilla bean (both the pod and the seeds) and half a cup of the granulated sugar. Place the saucepan over medium heat. Heat the cream until it’s steaming and the sugar is completely dissolved (5-7 minutes). Stir occasionally. Remove from heat and let steep for at least 30 minutes (or up to 2 hours).
- While the cream is steeping, in a separate medium-sized bowl, whisk together the egg yolks, the remaining half cup of granulated sugar, and a pinch of salt until the mixture is pale yellow and slightly thickened (2-3 minutes).
- Slowly drizzle a small amount of the warm cream mixture (about 1/2 cup) into the egg yolk mixture while whisking constantly. Continue to whisk until the mixture is smooth and well combined.
- Slowly pour the tempered egg yolk mixture back into the saucepan with the remaining warm cream. Whisk gently to combine. Strain the mixture through a fine-mesh sieve into a clean bowl or measuring cup.
- Preheat oven to 325°F (160°C). Arrange ramekins (6-8) in a baking dish with sides at least 2 inches high.
- Carefully pour the custard mixture into the ramekins, filling them almost to the top.
- Carefully pour hot water into the baking dish, filling it until the water level reaches about halfway up the sides of the ramekins.
- Gently place the baking dish in the preheated oven and bake for 40-50 minutes, or until the custards are set around the edges but still slightly wobbly in the center.
- Once baked, carefully remove the baking dish from the oven and let the ramekins cool in the water bath for about 30 minutes. Then, remove the ramekins from the water bath and let them cool completely at room temperature. Once cooled, cover the ramekins with plastic wrap and refrigerate for at least 4 hours, or preferably overnight.
- Before brûléeing, make sure the tops of the custards are completely dry.
- Sprinkle a thin, even layer of turbinado sugar over the top of each custard.
- Using a kitchen torch, hold the flame about 2-3 inches away from the surface of the sugar and move it in a circular motion until the sugar melts and caramelizes to a deep golden brown. If you don’t have a kitchen torch, you can also use the broiler in your oven. Place the ramekins on a baking sheet and broil them for a few minutes, watching them very closely to prevent burning.
- After brûléeing, let the sugar crust harden for a minute or two before serving.
- Serve immediately.
Notes
- Use high-quality ingredients for the best flavor.
- Don’t overbake the custard. It should be set around the edges but still slightly wobbly in the center.
- Chill the custard thoroughly for at least 4 hours, or preferably overnight.
- Brûlée the sugar just before serving, as the crust will soften over time.
- Be careful when using the kitchen torch.
- Prep Time: 20 minutes
- Cook Time: 40-50 minutes
Leave a Comment