
Fried Ice Cream: the very name sounds like a culinary paradox, doesn’t it? A delightful contradiction that sparks curiosity and promises a taste bud adventure. Imagine biting into a warm, crispy shell that gives way to a surprisingly cold and creamy center. It’s a textural and temperature sensation unlike any other, and I’m thrilled to share my foolproof recipe with you!
While the exact origins of fried ice cream are debated, with claims ranging from the 1893 Chicago World’s Fair to various restaurants in the mid-20th century, its appeal is undeniable. Regardless of its true birthplace, this dessert has become a beloved treat in Mexican restaurants and fairs across America, often associated with festive celebrations and a touch of whimsy.
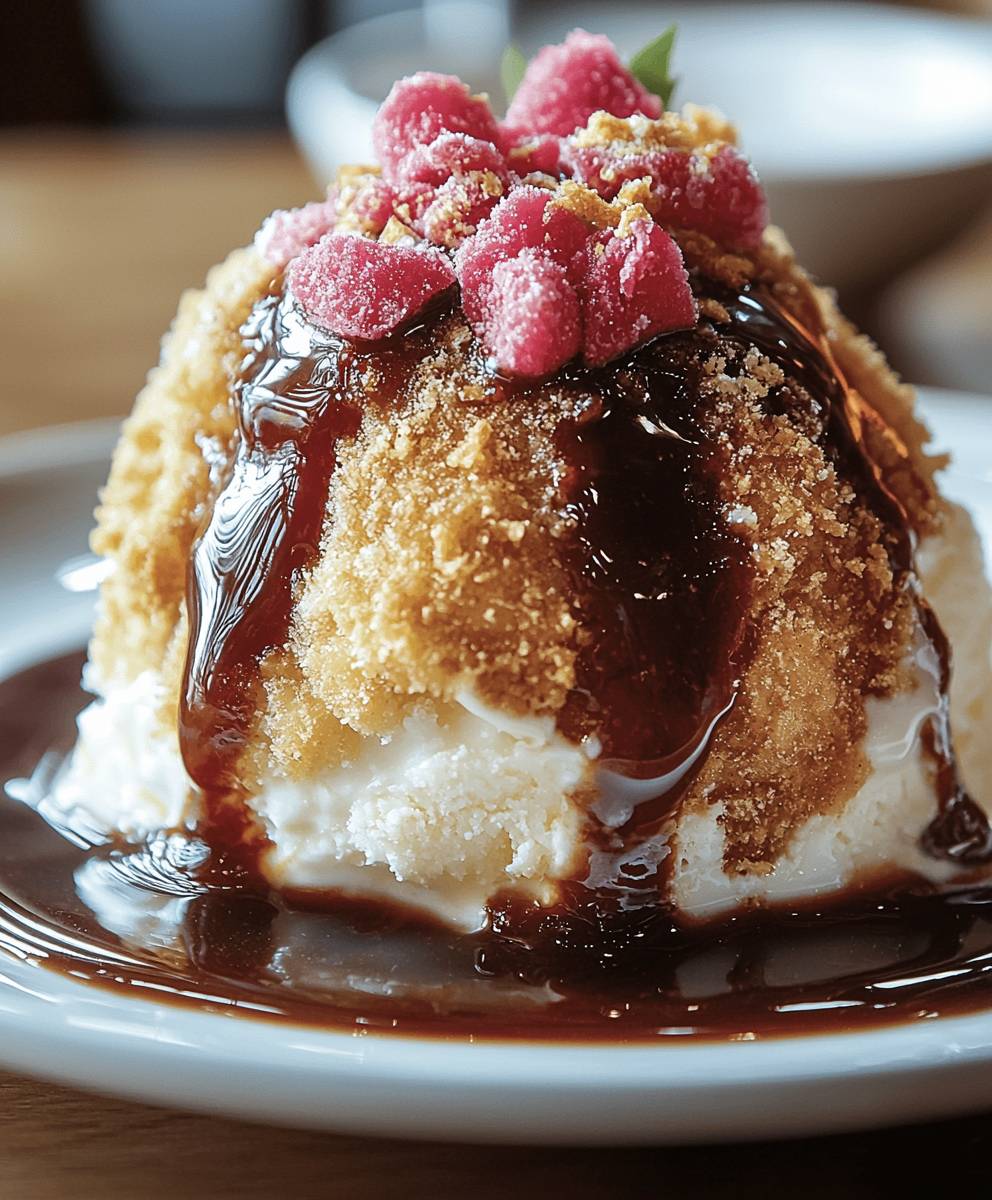
What makes this dessert so irresistible? It’s the unexpected contrast, of course! The cinnamon-sugar coated, crunchy exterior provides a satisfying warmth and delightful spice, while the cold, smooth ice cream inside offers a refreshing counterpoint. It’s also incredibly fun to eat! Plus, with a little practice, it’s surprisingly easy to make at home, allowing you to impress your friends and family with a restaurant-worthy dessert. Get ready to experience the magic of hot and cold with this incredible fried ice cream recipe!

Ingredients:
- 1 quart high-quality vanilla ice cream (or your favorite flavor!)
- 1 cup cornflakes, finely crushed
- 1/2 cup shredded coconut, sweetened or unsweetened
- 1/4 cup chopped pecans or walnuts (optional)
- 2 large eggs, beaten
- 1/4 cup milk
- 1 cup all-purpose flour
- 2 cups vegetable oil, for frying
- Optional toppings: honey, chocolate syrup, whipped cream, sprinkles, fresh fruit
Preparing the Ice Cream Balls:
Okay, let’s get started! The most crucial part of this recipe is freezing the ice cream solid. We need to form it into balls that will hold their shape during the brief frying process. Trust me, this step is essential to avoid a melty mess!
- Scoop the ice cream: Using an ice cream scoop (preferably one with a release mechanism), scoop out balls of ice cream. Aim for about 2-3 inches in diameter. Work quickly to prevent the ice cream from melting too much.
- Place on a baking sheet: Line a baking sheet with parchment paper or plastic wrap. This will prevent the ice cream balls from sticking. Place the scooped ice cream balls onto the prepared baking sheet, leaving a little space between each one.
- Freeze solid: Cover the baking sheet with plastic wrap and place it in the freezer for at least 4 hours, or preferably overnight. The longer they freeze, the better they’ll hold up during frying. I usually leave mine overnight just to be safe. You want them rock solid!
Preparing the Coating Mixture:
While the ice cream is freezing, let’s get the coating ready. This is what gives the fried ice cream its signature crispy texture and nutty flavor. We’re going for a golden-brown, crunchy shell that contrasts beautifully with the cold, creamy ice cream inside.
- Crush the cornflakes: In a large zip-top bag, place the cornflakes. Seal the bag and crush the cornflakes into fine crumbs using a rolling pin or your hands. You want them to be almost like a coarse powder. This will help them adhere to the ice cream better.
- Combine the dry ingredients: In a shallow dish, combine the crushed cornflakes, shredded coconut, and chopped nuts (if using). Mix well to ensure everything is evenly distributed. This mixture will be the first layer of our coating.
- Prepare the egg wash: In another shallow dish, whisk together the beaten eggs and milk. This egg wash will help the dry ingredients stick to the ice cream. Make sure the eggs are well combined with the milk for a smooth consistency.
- Prepare the flour: In a third shallow dish, place the all-purpose flour. This will be the first layer to help the egg wash stick.
Coating the Ice Cream Balls:
Now comes the fun (and slightly messy) part! We’re going to coat the frozen ice cream balls in the prepared mixtures. Work quickly and efficiently to prevent the ice cream from melting too much. It’s like a race against time, but the reward is totally worth it!
- First coat of flour: Remove the frozen ice cream balls from the freezer. Working one at a time, gently roll each ice cream ball in the flour, making sure it’s completely coated. This layer helps the egg wash adhere better.
- Coat in egg wash: Dip the floured ice cream ball into the egg wash, ensuring it’s fully coated. Let any excess egg wash drip off.
- Coat in cornflake mixture: Immediately transfer the egg-washed ice cream ball to the cornflake mixture. Roll it around until it’s completely covered in the cornflake, coconut, and nut mixture. Press gently to help the coating adhere.
- Double coat (optional but recommended): For an extra-thick and crunchy coating, repeat steps 1-3. This will provide an extra layer of protection against melting during frying. I highly recommend this step for the best results!
- Freeze again: Place the coated ice cream balls back onto the prepared baking sheet and return them to the freezer for at least 1 hour. This will help the coating set and prevent it from falling off during frying.
Frying the Ice Cream:
This is where the magic happens! We’re going to briefly fry the coated ice cream balls in hot oil to create a crispy, golden-brown shell. The key is to work quickly and maintain a consistent oil temperature. Don’t be intimidated it’s easier than it sounds!
- Heat the oil: Pour the vegetable oil into a deep saucepan or pot. Heat the oil over medium-high heat until it reaches a temperature of 350-375°F (175-190°C). Use a deep-fry thermometer to monitor the temperature. If you don’t have a thermometer, you can test the oil by dropping a small piece of bread into it. If the bread turns golden brown in about 30 seconds, the oil is ready.
- Fry the ice cream balls: Carefully remove the coated ice cream balls from the freezer. Working one or two at a time (depending on the size of your pot), gently lower the ice cream balls into the hot oil using a slotted spoon or tongs.
- Fry briefly: Fry the ice cream balls for only 10-15 seconds per side, or until they are golden brown and crispy. Be careful not to overcook them, as the ice cream will start to melt. The goal is to quickly sear the coating without melting the ice cream inside.
- Remove and drain: Using a slotted spoon, carefully remove the fried ice cream balls from the oil and place them on a wire rack lined with paper towels to drain any excess oil.
Serving and Enjoying:
Now for the best part serving and enjoying your homemade fried ice cream! Get creative with your toppings and presentation. This is your chance to customize your dessert and make it truly special.
- Plate the ice cream: Place the fried ice cream balls on individual plates or bowls.
- Add toppings: Drizzle with honey, chocolate syrup, or caramel sauce. Top with whipped cream, sprinkles, fresh fruit, or any other toppings you desire. Get creative and have fun!
- Serve immediately: Fried ice cream is best served immediately, while the coating is still crispy and the ice cream is cold and firm. Don’t wait too long, or the ice cream will start to melt.
- Enjoy! Take a bite and savor the delicious combination of crispy, warm coating and cold, creamy ice cream. It’s a truly decadent and satisfying treat!
Tips for Success:
- Use high-quality ice cream: The better the ice cream, the better the final product will be. Choose a flavor you love and that is dense and creamy.
- Freeze the ice cream solid: This is the most important step! Make sure the ice cream balls are completely frozen before coating and frying.
- Work quickly: The faster you work, the less time the ice cream has to melt.
- Maintain a consistent oil temperature: Use a deep-fry thermometer to ensure the oil is at the correct temperature.
- Don’t overcrowd the pot: Fry the ice cream balls in small batches to prevent the oil temperature from dropping too much.
- Serve immediately: Fried ice cream is best served right away, while the coating is still crispy and the ice cream is cold.
Variations:
- Different ice cream flavors: Experiment with different ice cream flavors, such as chocolate, strawberry, or coffee.
- Different coatings: Try using different types of cereal, such as frosted flakes or rice krispies. You can also add spices like cinnamon or nutmeg to the coating mixture.
- Different toppings: Get creative with your toppings! Try using different sauces, fruits, nuts, or candies.
- Mexican Fried Ice Cream: Add cinnamon and sugar to the cornflake mixture for a more authentic Mexican flavor. Serve with whipped cream, chocolate syrup, and a cherry on top.
Conclusion:
Well, there you have it! I truly believe this Fried Ice Cream recipe is an absolute must-try. It’s not just a dessert; it’s an experience, a delightful dance of textures and temperatures that will leave you and your guests utterly impressed. The warm, crispy coating gives way to the cool, creamy ice cream in a way that’s simply magical. It’s the kind of dessert that sparks conversation and creates lasting memories. Why is it a must-try? Because it’s surprisingly easy to make! Don’t let the name intimidate you. With a little preparation and a few simple steps, you can recreate this restaurant favorite in your own kitchen. Plus, it’s incredibly versatile. You can customize the ice cream flavors, the coating ingredients, and the toppings to perfectly suit your taste. Speaking of customization, let’s talk serving suggestions and variations. For a classic presentation, serve your Fried Ice Cream in a chilled bowl or sundae glass. Drizzle it with honey, chocolate syrup, or caramel sauce. A sprinkle of cinnamon or a dusting of powdered sugar adds a touch of elegance. But don’t stop there! Get creative! Try using different ice cream flavors. Strawberry, coffee, or even pistachio would be fantastic. For the coating, consider adding chopped nuts, shredded coconut, or even crushed pretzels for extra crunch and flavor. And the toppings? The possibilities are endless! Fresh berries, whipped cream, toasted almonds, a cherry on top go wild! For a more decadent treat, try drizzling it with a homemade salted caramel sauce. Or, for a spicy kick, add a pinch of chili powder to the coating. If you’re feeling adventurous, try making mini Fried Ice Cream bites for a party appetizer. Simply use a small ice cream scoop to create bite-sized balls, freeze them, and then coat and fry them as directed. They’re perfect for sharing and are always a crowd-pleaser. Another fun variation is to use different types of bread for the coating. Instead of cornflakes, try using crushed graham crackers, gingersnaps, or even crushed tortilla chips for a unique Southwestern twist. I’m so excited for you to try this recipe! I know you’re going to love it. It’s the perfect dessert for any occasion, from a casual weeknight treat to a special celebration. It’s guaranteed to impress your friends and family, and it’s a fun and rewarding project to tackle in the kitchen. So, what are you waiting for? Gather your ingredients, put on your apron, and get ready to create some culinary magic. I promise you won’t be disappointed. And most importantly, I want to hear about your experience! Once you’ve tried this Fried Ice Cream recipe, please come back and share your thoughts in the comments below. Let me know what variations you tried, what toppings you used, and how much you enjoyed it. I love hearing from you and seeing your creations! Your feedback helps me improve my recipes and inspires other readers to try them as well. Happy cooking (and eating)! Print
Fried Ice Cream: The Ultimate Guide to Making It at Home
- Total Time: 305 minutes
- Yield: 6–8 servings 1x
Description
Crispy, golden-brown fried ice cream with a crunchy cornflake coating, served with your favorite toppings. A decadent treat with a warm exterior and a cold, creamy interior.
Ingredients
- 1 quart high-quality vanilla ice cream (or your favorite flavor!)
- 1 cup cornflakes, finely crushed
- 1/2 cup shredded coconut, sweetened or unsweetened
- 1/4 cup chopped pecans or walnuts (optional)
- 2 large eggs, beaten
- 1/4 cup milk
- 1 cup all-purpose flour
- 2 cups vegetable oil, for frying
- Optional toppings: honey, chocolate syrup, whipped cream, sprinkles, fresh fruit
Instructions
- Scoop the ice cream: Using an ice cream scoop, scoop out balls of ice cream (2-3 inches in diameter). Work quickly.
- Place on a baking sheet: Line a baking sheet with parchment paper or plastic wrap. Place the scooped ice cream balls onto the prepared baking sheet, leaving a little space between each one.
- Freeze solid: Cover the baking sheet with plastic wrap and place it in the freezer for at least 4 hours, or preferably overnight.
- Crush the cornflakes: In a large zip-top bag, place the cornflakes. Seal the bag and crush the cornflakes into fine crumbs using a rolling pin or your hands.
- Combine the dry ingredients: In a shallow dish, combine the crushed cornflakes, shredded coconut, and chopped nuts (if using). Mix well.
- Prepare the egg wash: In another shallow dish, whisk together the beaten eggs and milk.
- Prepare the flour: In a third shallow dish, place the all-purpose flour.
- First coat of flour: Remove the frozen ice cream balls from the freezer. Working one at a time, gently roll each ice cream ball in the flour, making sure it’s completely coated.
- Coat in egg wash: Dip the floured ice cream ball into the egg wash, ensuring it’s fully coated. Let any excess egg wash drip off.
- Coat in cornflake mixture: Immediately transfer the egg-washed ice cream ball to the cornflake mixture. Roll it around until it’s completely covered in the cornflake, coconut, and nut mixture. Press gently to help the coating adhere.
- Double coat (optional but recommended): For an extra-thick and crunchy coating, repeat steps 1-3.
- Freeze again: Place the coated ice cream balls back onto the prepared baking sheet and return them to the freezer for at least 1 hour.
- Heat the oil: Pour the vegetable oil into a deep saucepan or pot. Heat the oil over medium-high heat until it reaches a temperature of 350-375°F (175-190°C).
- Fry the ice cream balls: Carefully remove the coated ice cream balls from the freezer. Working one or two at a time, gently lower the ice cream balls into the hot oil using a slotted spoon or tongs.
- Fry briefly: Fry the ice cream balls for only 10-15 seconds per side, or until they are golden brown and crispy.
- Remove and drain: Using a slotted spoon, carefully remove the fried ice cream balls from the oil and place them on a wire rack lined with paper towels to drain any excess oil.
- Plate the ice cream: Place the fried ice cream balls on individual plates or bowls.
- Add toppings: Drizzle with honey, chocolate syrup, or caramel sauce. Top with whipped cream, sprinkles, fresh fruit, or any other toppings you desire.
- Serve immediately: Fried ice cream is best served immediately.
- Enjoy!
Notes
- Use high-quality ice cream for the best results.
- Freezing the ice cream solid is crucial.
- Work quickly to prevent melting.
- Maintain a consistent oil temperature.
- Don’t overcrowd the pot when frying.
- Serve immediately.
- Experiment with different ice cream flavors, coatings, and toppings.
- For Mexican Fried Ice Cream, add cinnamon and sugar to the cornflake mixture.
- Prep Time: 25 minutes
- Cook Time: 5 minutes

Leave a Comment