
Peanut Butter Cups Delight is a treat that brings joy to both the young and the young at heart. As a classic favorite, these delectable confections have a rich history that dates back to the 1920s when they were first introduced by the H.B. Reese Candy Company. Over the years, they have become a staple in American candy culture, often associated with childhood memories and festive celebrations. What I love most about Peanut Butter Cups Delight is the perfect harmony of creamy peanut butter and smooth chocolate, creating a taste sensation that is simply irresistible.
People adore this dish not only for its delightful flavor but also for its satisfying texture that combines the crunch of chocolate with the velvety richness of peanut butter. Plus, they are incredibly convenient to make at home, allowing you to customize them to your liking. Whether you enjoy them as a quick snack or a special dessert, Peanut Butter Cups Delight is sure to bring a smile to your face and warmth to your heart.

Ingredients:
- 1 cup creamy peanut butter
- 1/2 cup powdered sugar
- 1/4 cup unsalted butter, softened
- 1 teaspoon vanilla extract
- 1 1/2 cups milk chocolate chips
- 1/2 cup semi-sweet chocolate chips
- 1/4 teaspoon salt
- Mini cupcake liners (for serving)
Preparing the Peanut Butter Filling
- In a medium mixing bowl, combine 1 cup of creamy peanut butter, 1/2 cup of powdered sugar, 1/4 cup of softened unsalted butter, and 1 teaspoon of vanilla extract. The combination of these ingredients will create a rich and creamy filling.
- Using a hand mixer or a sturdy spatula, mix the ingredients together until they are well combined and smooth. You want to ensure there are no lumps, so take your time with this step. The mixture should be thick but spreadable.
- Once the filling is smooth, set it aside while you prepare the chocolate coating. This will allow the flavors to meld together a bit more.
Melting the Chocolate
- In a microwave-safe bowl, combine 1 1/2 cups of milk chocolate chips and 1/2 cup of semi-sweet chocolate chips. The combination of these two types of chocolate will give your peanut butter cups a rich flavor.
- Microwave the chocolate chips in 30-second intervals, stirring in between each interval. This will help prevent the chocolate from burning. Continue this process until the chocolate is completely melted and smooth.
- Once melted, add 1/4 teaspoon of salt to the chocolate and stir well. The salt will enhance the sweetness of the chocolate and balance the flavors.
Assembling the Peanut Butter Cups
- Line a mini muffin tin with mini cupcake liners. This will make it easy to remove the peanut butter cups once they are set.
- Using a spoon or a small cookie scoop, add about 1 tablespoon of the melted chocolate to the bottom of each cupcake liner. Make sure to spread it evenly across the bottom to create a nice base for your peanut butter filling.
- Next, take the peanut butter filling you prepared earlier and scoop about 1 tablespoon of it into each cupcake liner on top of the melted chocolate. Gently press it down to ensure it adheres to the chocolate base.
- Once all the liners are filled with peanut butter, its time to top them off with more melted chocolate. Use the remaining melted chocolate to cover the peanut butter filling, ensuring that it is completely sealed. This will create a delicious chocolate shell around the peanut butter.
- After youve added the chocolate topping, gently tap the muffin tin on the counter to help settle the chocolate and remove any air bubbles. This will also help the layers stick together better.
Chilling and Setting
- Place the muffin tin in the refrigerator for at least 1 hour, or until the chocolate has completely set. This step is crucial as it allows the chocolate to harden and the flavors to meld together.
- Once the chocolate is firm, carefully remove the peanut butter cups from the muffin tin by peeling away the cupcake liners. If they are sticking, you can gently run a knife around the edges to help release them.
- At this point, you can enjoy your Peanut Butter Cups Delight as is, or you can take it a step further by drizzling some extra melted chocolate on top for a decorative touch. Just melt a small amount of chocolate and use a fork to drizzle it over the cups.
Storing Your Peanut Butter Cups
- Store any leftover peanut butter cups in an airtight container in the refrigerator. They will stay fresh for up to two weeks, but I doubt theyll last that long!
- If you want to keep them for a longer period, you can freeze them. Just make sure to separate layers with parchment paper to prevent sticking. They can be frozen for up to three months.
Serving Suggestions
- These Peanut Butter Cups Delight are perfect for parties,

Conclusion:
In summary, the Peanut Butter Cups Delight recipe is an absolute must-try for anyone who loves the rich, creamy combination of chocolate and peanut butter. This delightful treat not only satisfies your sweet tooth but also brings a sense of nostalgia that many of us cherish. The simplicity of the recipe makes it accessible for bakers of all skill levels, and the end result is nothing short of heavenly. For serving suggestions, consider pairing these indulgent cups with a glass of cold milk or a warm cup of coffee to enhance the flavors. You can also get creative with variationstry adding a sprinkle of sea salt on top for a sweet and salty twist, or mix in some crushed nuts for added texture. If you’re feeling adventurous, experiment with different types of chocolate, such as dark or white chocolate, to create your own unique version of this classic treat. I wholeheartedly encourage you to give this Peanut Butter Cups Delight recipe a try. I promise you wont be disappointed! Once youve made them, Id love to hear about your experience. Share your thoughts, any variations you tried, or even a photo of your delicious creations. Lets spread the joy of these delightful treats together! Print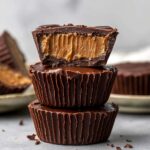
Peanut Butter Cups Delight: Indulge in the Ultimate Chocolate Treat
- Total Time: 30 minutes
- Yield: 12 cups 1x
Description
Indulge in these homemade peanut butter cups, featuring a creamy peanut butter filling encased in rich chocolate. Perfect for satisfying your sweet tooth, these treats are easy to make and sure to impress!
Ingredients
- 1 cup creamy peanut butter
- 1/2 cup powdered sugar
- 1 cup milk chocolate chips
- 1/4 cup butter
- 1/2 teaspoon vanilla extract
Instructions
- In einer Schüssel Erdnussbutter, Puderzucker und Vanilleextrakt vermengen.
- Die Mischung gut verrühren, bis sie cremig ist.
- In einer Muffinform Papierförmchen platzieren.
- Eine Schicht geschmolzene Schokolade in die Förmchen geben.
- Ein Esslöffel der Erdnussbuttermischung auf die Schokolade geben.
- Mit einer weiteren Schicht geschmolzener Schokolade bedecken.
- Die Förmchen in den Kühlschrank stellen, bis die Schokolade fest ist.
- Vor dem Servieren in den Kühlschrank aufbewahren.
Notes
- Die Erdnussbutter sollte Raumtemperatur haben, um sich besser mit den anderen Zutaten zu vermischen.
- Für eine vegane Variante kann dunkle Schokolade ohne Milch verwendet werden.
- Die Füllung kann nach Belieben mit Honig oder Agavendicksaft gesüßt werden.
- Die Erdnussbutter-Mischung kann auch mit einer Prise Salz verfeinert werden.
- Prep Time: 15 minutes
- Cook Time: 30 minutes
Leave a Comment