
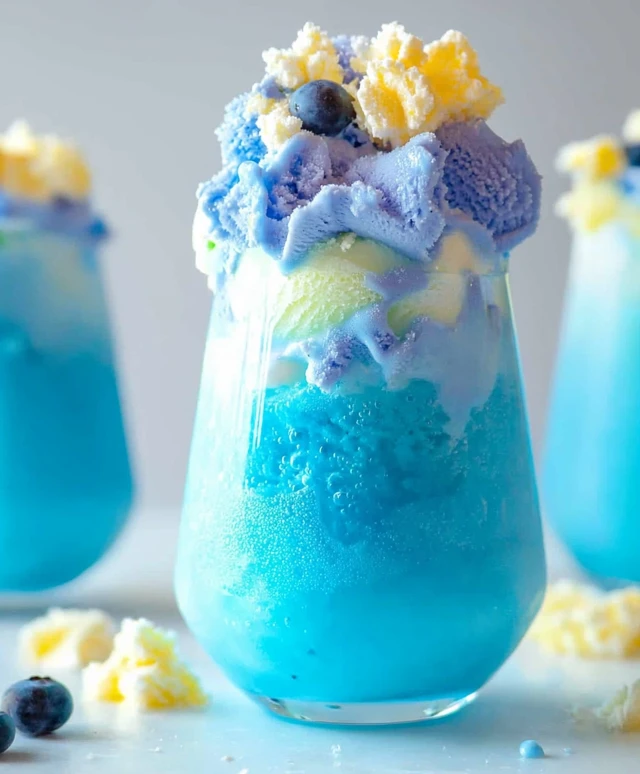
Blue Ice Cream Float is a delightful treat that brings a splash of color and a wave of nostalgia to any gathering. This whimsical dessert combines the creamy richness of ice cream with the fizzy refreshment of soda, creating a perfect balance of flavors and textures that is sure to please both kids and adults alike. Originating from classic American soda fountains, the Blue Ice Cream Float has become a beloved staple at summer barbecues and birthday parties, evoking memories of carefree days spent with friends and family.
What makes the Blue Ice Cream Float so irresistible is not just its vibrant hue, but also the delightful contrast between the cold, velvety ice cream and the bubbly, sweet soda. The combination is not only visually stunning but also incredibly satisfying, making it a go-to choice for those looking to indulge in a sweet treat. Whether youre enjoying it on a hot summer day or serving it at a festive gathering, the Blue Ice Cream Float is sure to bring smiles and create lasting memories. Join me as we dive into this fun and easy recipe that will elevate your dessert game!

Ingredients:
- 2 cups of blue raspberry soda
- 1 cup of vanilla ice cream
- 1/2 cup of whipped cream
- Blue food coloring (optional)
- Maraschino cherries for garnish
- Blue sprinkles for garnish
- Ice cubes (optional)
Preparing the Float
Lets dive right into making this delightful Blue Ice Cream Float! Its a fun and refreshing treat thats perfect for hot days or any time you want to impress your friends and family. Heres how I do it:
- Gather Your Ingredients: Start by gathering all the ingredients listed above. Make sure you have everything on hand before you start. It makes the process so much smoother!
- Chill Your Glasses: For an extra refreshing experience, I like to chill my glasses in the freezer for about 10-15 minutes before serving. This keeps the float nice and cold.
- Prepare the Soda: If you want to enhance the color of your blue raspberry soda, you can add a few drops of blue food coloring. This step is optional, but it can make your float look even more vibrant and appealing!
- Add Ice Cubes (Optional): If you prefer your float to be extra cold, you can add a few ice cubes to your chilled glasses. This is especially nice if youre serving it on a hot day.
Assembling the Float
Now that we have everything prepped, its time to assemble our Blue Ice Cream Float!
- Scoop the Ice Cream: Take your vanilla ice cream and scoop about 1 cup into each chilled glass. I usually go for two generous scoops, but you can adjust this based on your preference. The ice cream will start to melt slightly, which is exactly what we want!
- Pour the Soda: Slowly pour the blue raspberry soda over the ice cream. I like to do this gently to avoid too much fizzing. Youll see the soda start to bubble and foam as it interacts with the ice cream, creating that classic float effect!
- Add Whipped Cream: Once the soda has settled a bit, top each float with a generous dollop of whipped cream. This adds a creamy texture and makes the float look extra indulgent.
- Garnish: Now for the fun part! Top your whipped cream with a maraschino cherry and sprinkle some blue sprinkles on top for that extra pop of color. You can get creative herefeel free to add more toppings if you like!
Serving the Float
Now that your Blue Ice Cream Floats are beautifully assembled, its time to serve them up!
- Serve Immediately: These floats are best enjoyed right away while the ice cream is still cold and the soda is fizzy. Grab some straws and spoons, and get ready to dig in!
- Enjoy with Friends: I love serving these floats at parties or gatherings. Theyre always a hit, and everyone loves the vibrant color and delicious flavor. Plus, theyre super easy to make, so you can whip up a batch in no time!
Tips and Variations
If you want to switch things up or add a personal touch to your Blue Ice Cream Float, here are some tips and variations you can try:
- Different Flavors: While blue raspberry soda is a classic choice, you can experiment with other flavors like lemon-lime soda or even a fruity punch. Just make sure the color complements the ice cream!
- Ice Cream Flavors: Vanilla is a great base, but you can also try other flavors like blue moon, cotton candy, or even a fruity sorbet for a dairy-free option.
- Layering: For a fun twist, you can layer the ice cream and soda in a clear glass to create a beautiful visual effect. Start with a scoop of ice cream, then pour a little soda, add another
Conclusion:
In summary, this Blue Ice Cream Float is an absolute must-try for anyone looking to add a splash of fun and flavor to their dessert repertoire. The vibrant blue color not only makes it visually stunning but also brings a delightful twist to the classic float we all know and love. With its refreshing combination of fizzy soda and creamy ice cream, its perfect for hot summer days, birthday parties, or simply when you want to treat yourself to something special. For serving suggestions, consider pairing your Blue Ice Cream Float with a slice of lemon cake or some homemade cookies for a delightful dessert spread. You can also experiment with variations by using different flavored sodas, such as lemon-lime or even a berry soda, to create your own unique twist on this recipe. If youre feeling adventurous, try adding a splash of fruit puree or a sprinkle of colorful sprinkles on top for an extra pop of flavor and fun! I encourage you to give this Blue Ice Cream Float a try and share your experience with friends and family. Whether youre enjoying it on a sunny afternoon or serving it at a gathering, Im sure it will be a hit! Dont forget to snap a picture and tag me when you do; Id love to see your creations and hear how you made this recipe your own. Happy floating! Print
Blue Ice Cream Float: A Refreshing Summer Treat You Must Try
- Total Time: 10 minutes
- Yield: 2 servings 1x
Description
This Blue Ice Cream Float is a delightful combination of blue raspberry soda and creamy vanilla ice cream, topped with whipped cream and colorful garnishes. It’s a perfect treat for hot days and parties, offering a fun and refreshing experience!
Ingredients
- 2 cups of blue raspberry soda
- 1 cup of vanilla ice cream
- 1/2 cup of whipped cream
- Blue food coloring (optional)
- Maraschino cherries for garnish
- Blue sprinkles for garnish
- Ice cubes (optional)
Instructions
- Gather Your Ingredients: Start by gathering all the ingredients listed above. Make sure you have everything on hand before you start. It makes the process so much smoother!
- Chill Your Glasses: For an extra refreshing experience, chill your glasses in the freezer for about 10-15 minutes before serving.
- Prepare the Soda: If desired, add a few drops of blue food coloring to enhance the color of your blue raspberry soda.
- Add Ice Cubes (Optional): If you prefer your float to be extra cold, add a few ice cubes to your chilled glasses.
- Scoop the Ice Cream: Scoop about 1 cup of vanilla ice cream into each chilled glass.
- Pour the Soda: Slowly pour the blue raspberry soda over the ice cream, allowing it to bubble and foam.
- Add Whipped Cream: Top each float with a generous dollop of whipped cream.
- Garnish: Add a maraschino cherry and sprinkle blue sprinkles on top for decoration.
- Serve Immediately: Enjoy your floats right away while the ice cream is cold and the soda is fizzy.
- Enjoy with Friends: Serve at parties or gatherings for a fun treat!
Notes
- Experiment with different soda flavors or ice cream varieties for a unique twist.
- Layering the ice cream and soda can create a beautiful visual effect.
- Prep Time: 10 minutes
- Cook Time: 0 minutes

Leave a Comment